CONTENT
BUSINESS PARTNER
A business partner is the highest-level object in an SAP S/4HANA ERP. A business partner may be an individual, a company, or a group. In terms of business, a business partner is categorised by a role. The roles you assign to business partners represent the responsibilities they have and the transactions they are likely to be a part of. During data exchange with SAP ERP, a business partner role is utilised for classification reasons.
T.Code to create Business Partner in SAP -> BP
CONFIGURATION OF BUSINESS PARTNER IN SAP
To create BP Roles, we need to create 3 roles –
- General – 000000
- Supplier Financial Accounting (FI Vendor) – FLVN00
- Supplier (Vendor) – FLVN01
These configuration steps are related to finance. MM includes only the BP Roles configurations, not the others, as given below. I have given a detailed structure of MM and FI so that if you ever face any error, you should know what things are configured and what data is used. Follow the steps clearly to avoid any confusion.
- BP ROLE -> MM
- BP ROLE GROUPING -> FI
- BP ROLE CATEGORY -> FI
- BP ROLE GROUPING CATEGORY -> FI
DEFINE BP ROLES
Step 1: General
Path -> SPRO -> IMG -> Cross-Application Components -> SAP Business Partner -> Business Partner -> Basic Settings -> Business Partner Roles -> Define BP Roles.
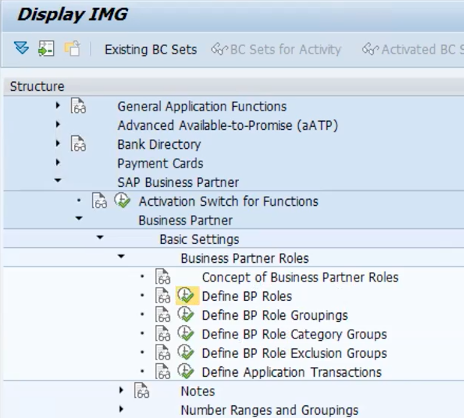
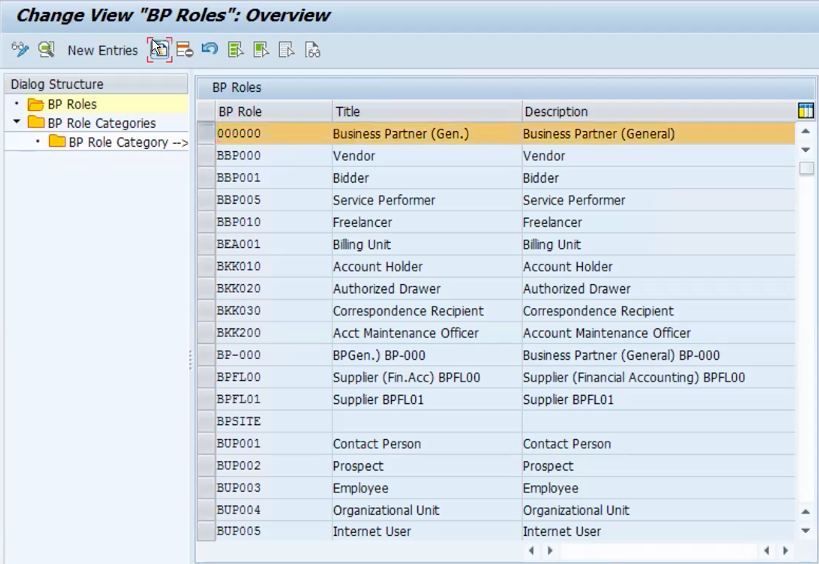
Select the Standard -> 000000 and copy. A new screen will open, you need to add some details.
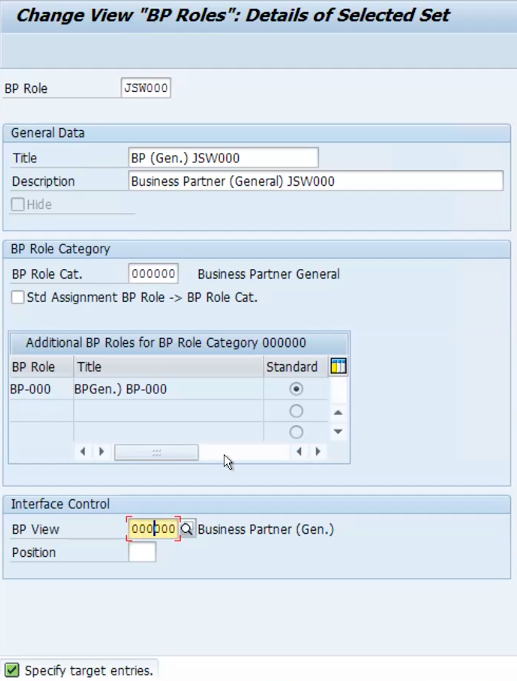
Add a new BP role name which you wish to keep. Example – JSW000 – is the new BP Role name. Give title and description. BP Role Category should be kept – 000000 (Standard). BP View – 000000 (Standard). Press enter.
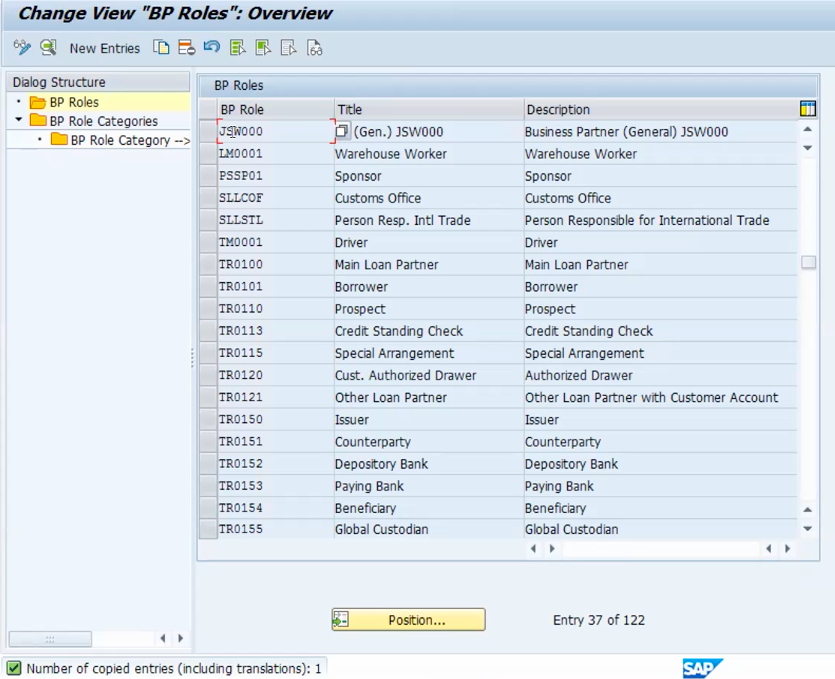
The data will get shown in the table and you need to save the data.
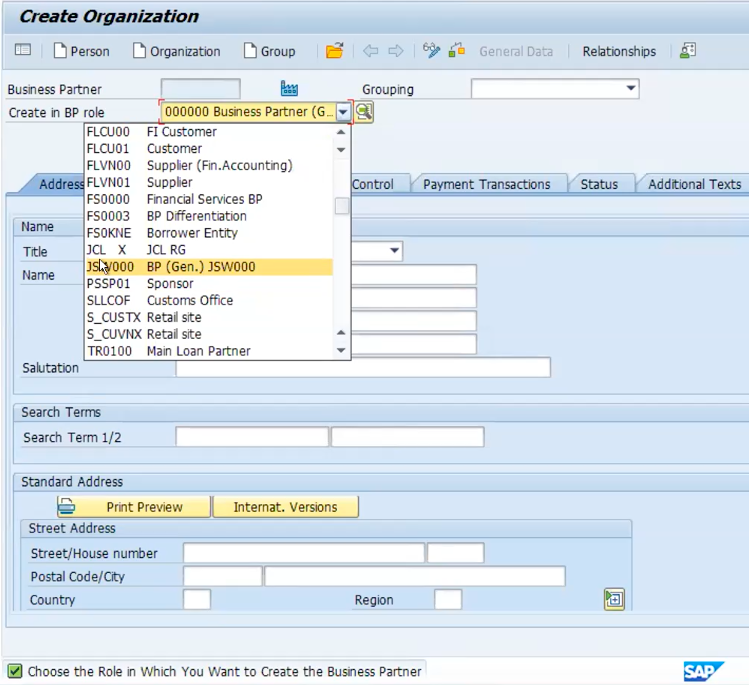
Now, if you go to transaction code BP. You will see the changes made in configuration.
Step 1: Supplier (Fin. Accounting)
Path -> SPRO -> IMG -> Cross-Application Components -> SAP Business Partner -> Business Partner -> Basic Settings -> Business Partner Roles -> Define BP Roles.
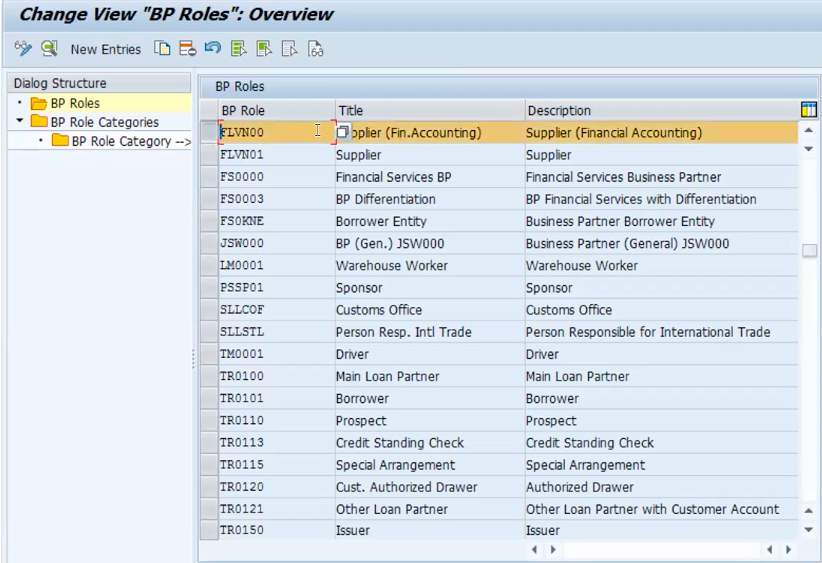
AS we did for the General BP role, same process is to be followed for FI Vendor. Select the FLVN00
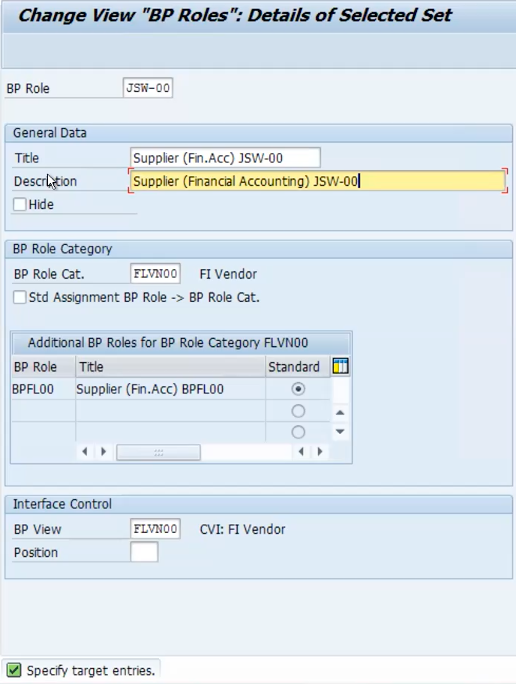
Add details and save the data at the end.
Step 1: Supplier
Path -> SPRO -> IMG -> Cross-Application Components -> SAP Business Partner -> Business Partner -> Basic Settings -> Business Partner Roles -> Define BP Roles.
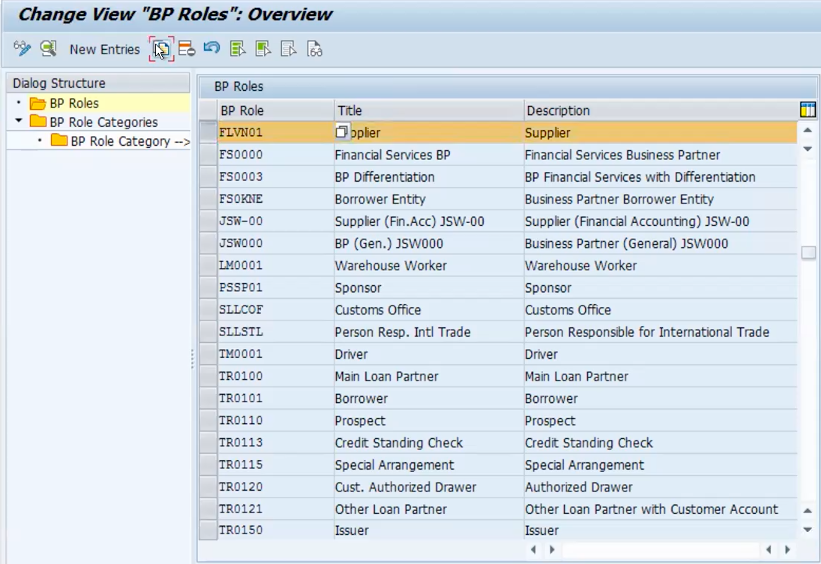
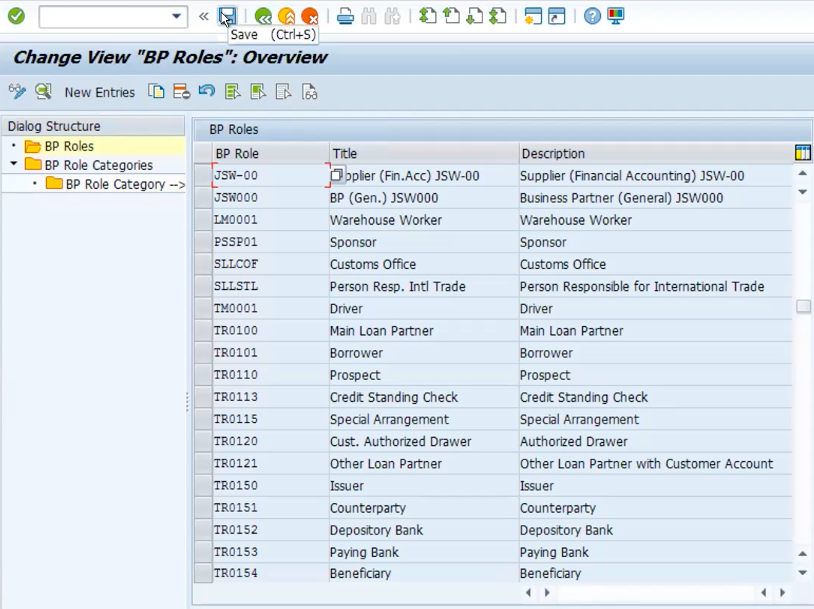
Similarly, do for FLVN01 Supplier. Add details and save the data.
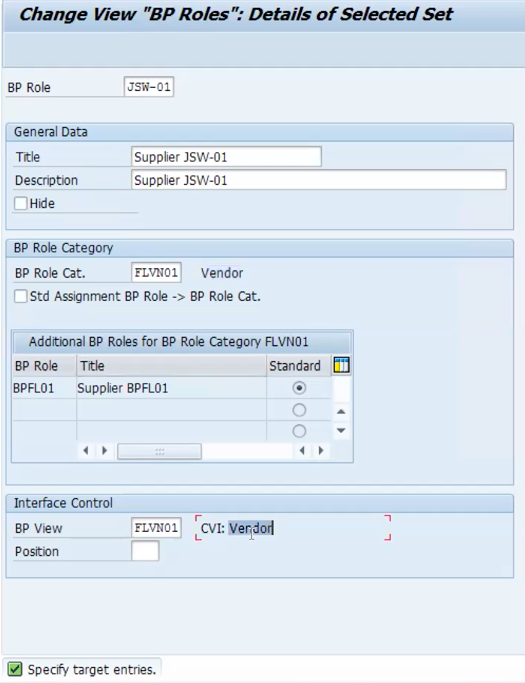
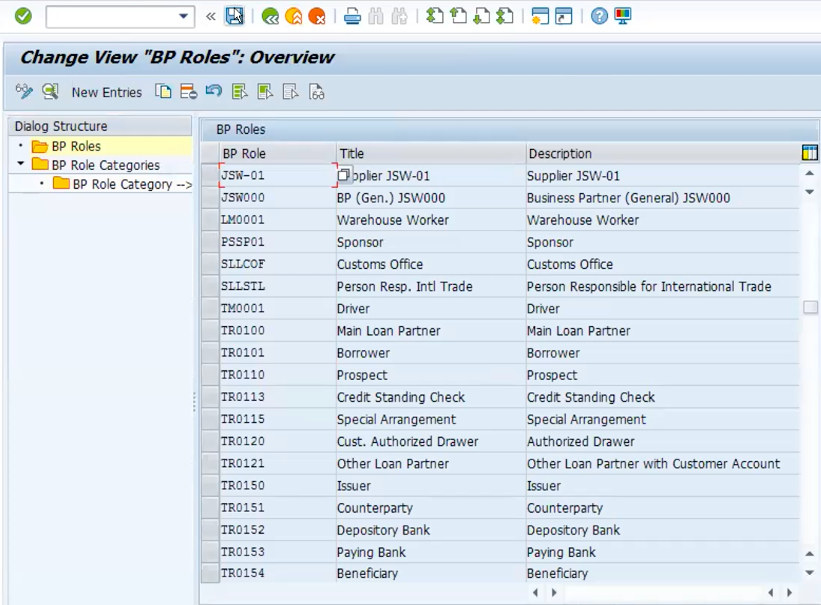
All the 3 BP Roles are now created.
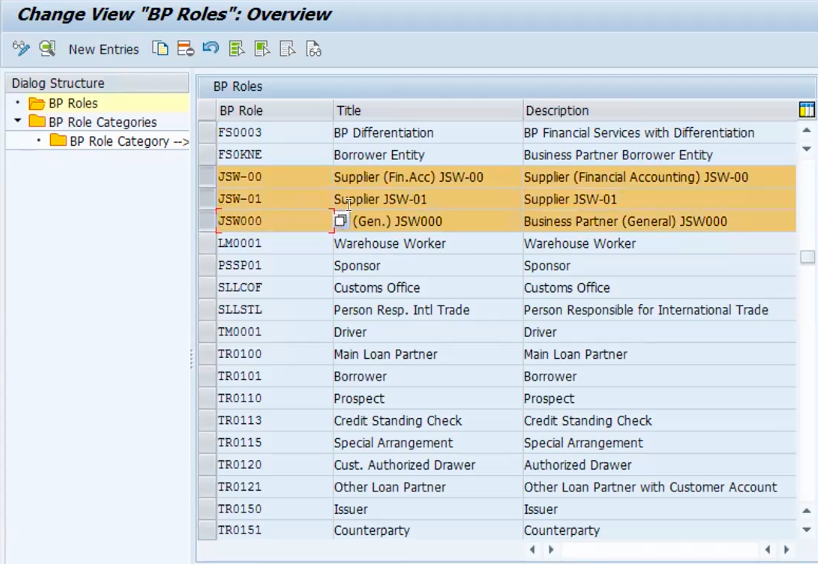
BP Role Category: You need to check the BP Role category of each of the BP Roles. In BP Role Category the data will be standard data and you need to open each standard data to check whether the transaction based setting is added or not.
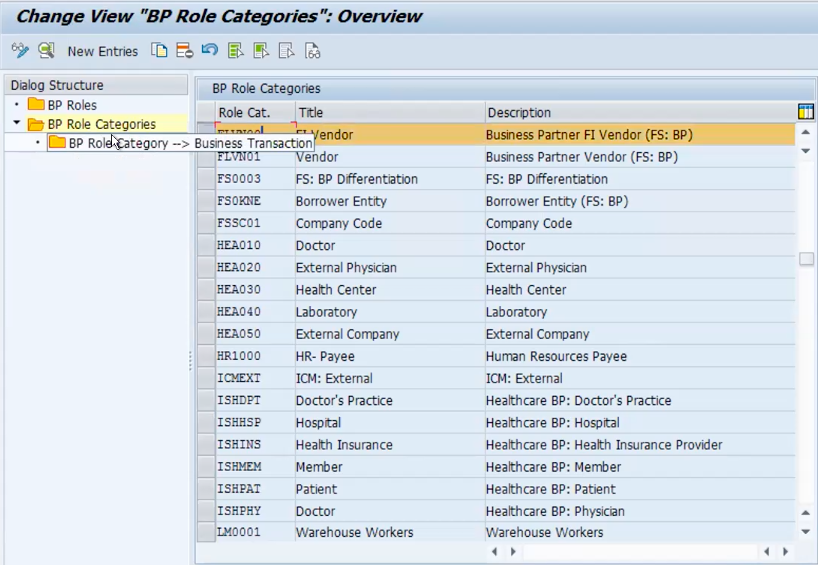
As you can se in the image above, the name is not changed instead it will show you the standard name of BP Role. And you need to click on the left side of the screen – BP Role Category – Business transaction. BP Role Category data should be available as shown below in the figure.
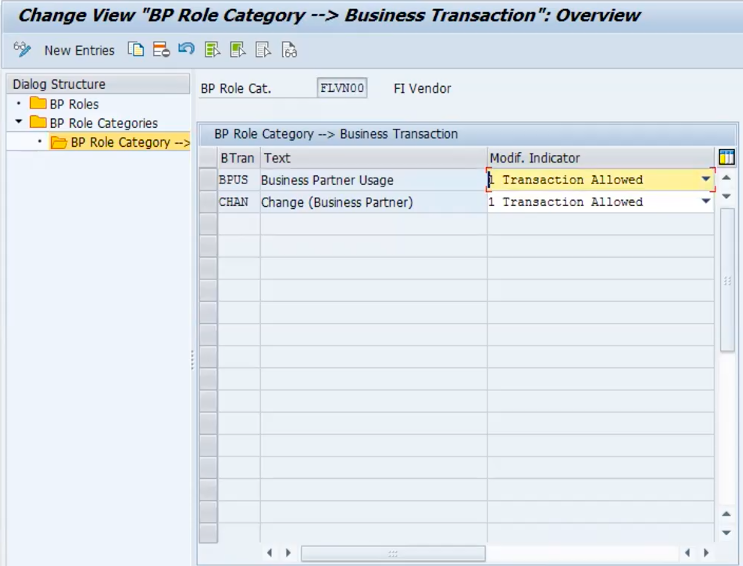
You need to check for all BP Roles.
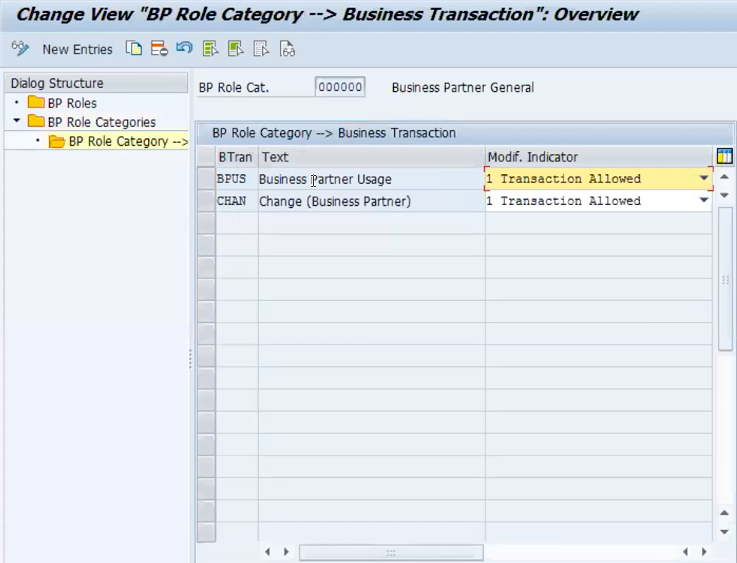
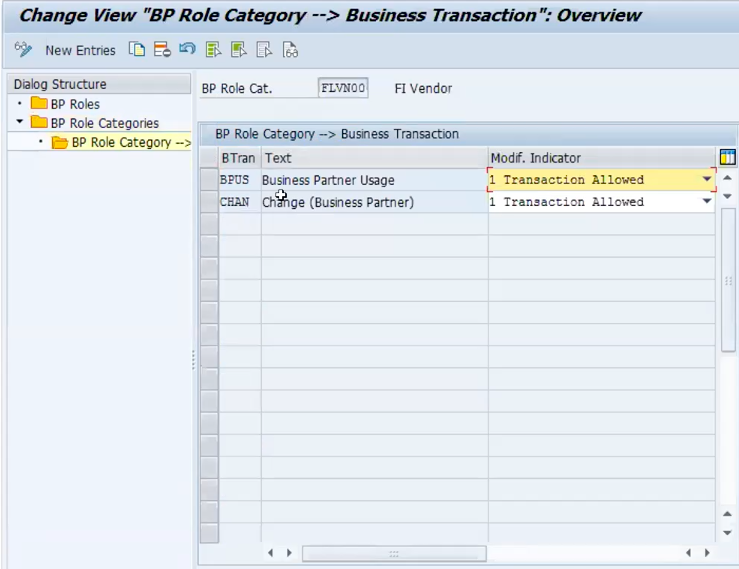
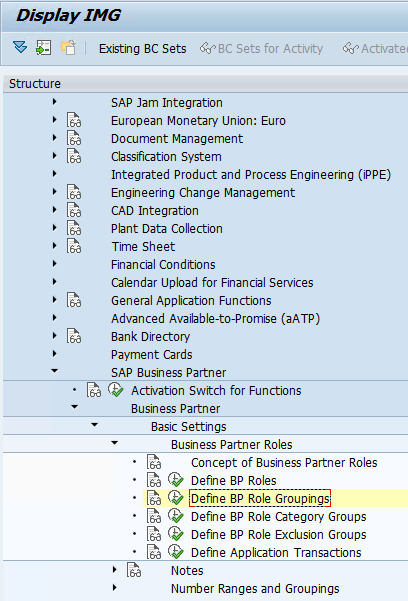
DEFINE BP ROLE GROUPINGS
Path -> SPRO -> IMG -> Cross-Application Components -> SAP Business Partner -> Business Partner -> Basic Settings -> Business Partner Roles -> Define BP Role Groupings.
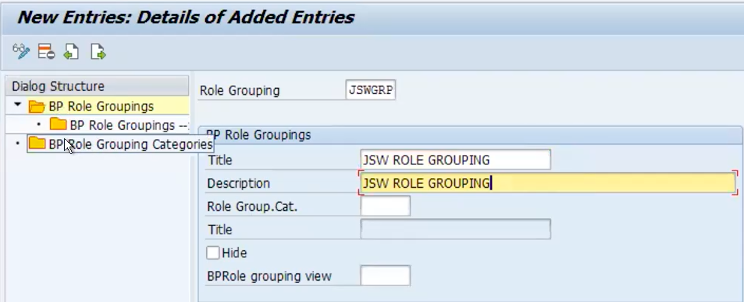
Click on new entries and fill out the data.
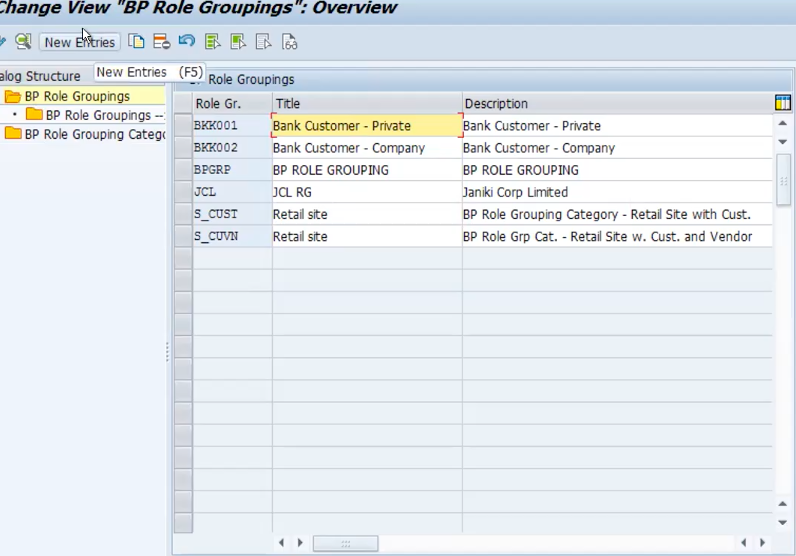
Save the data.
You have to now create BP Role Grouping Category. New entries and fill out the fields.
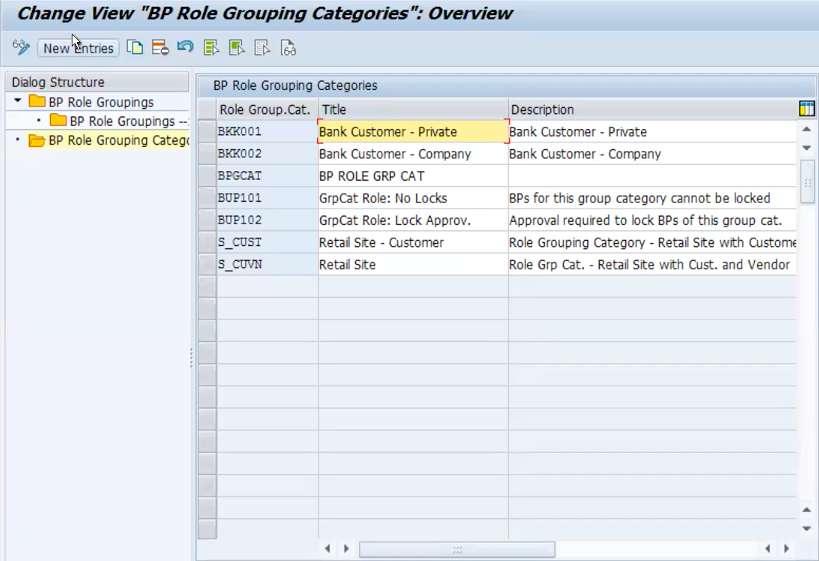
Save the data.
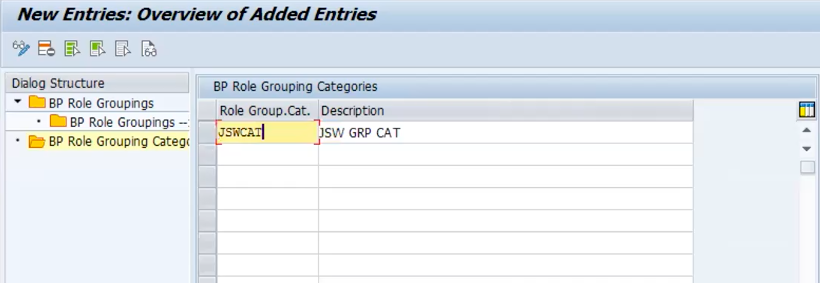
NOTE: While creating BP Roles, copy it from the standard BP Roles and while creating BP Role Groupings, create new entries.
Go to BP Role Grouping, and select the grouping you created. Open it.
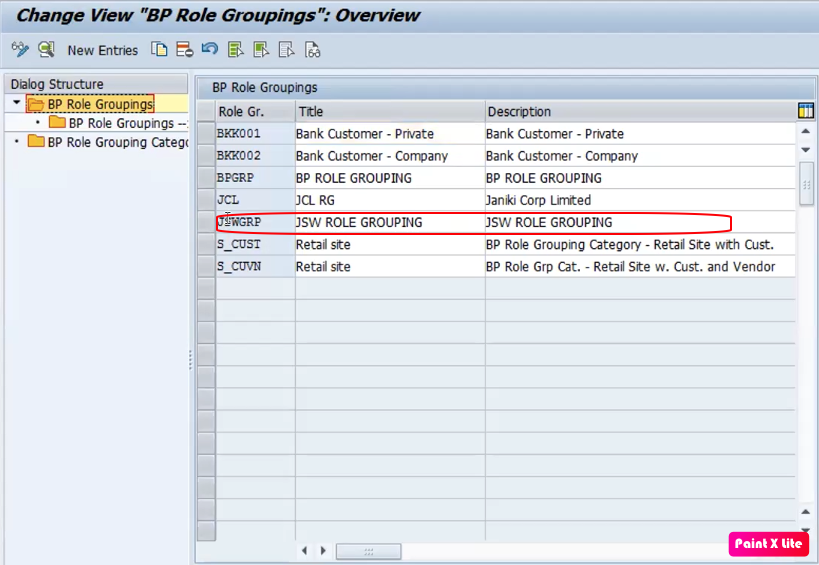
Add the grouping category you created above as shown in the figure below.
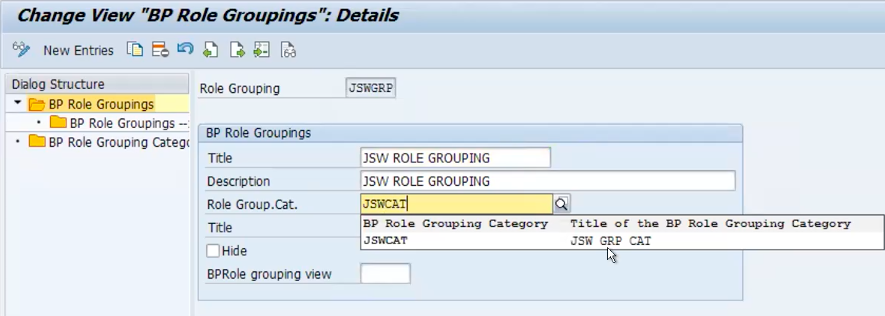
Save the data.
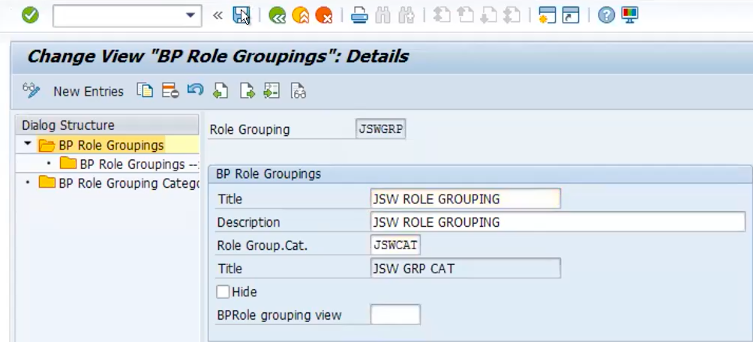
Go back and select the grouping.
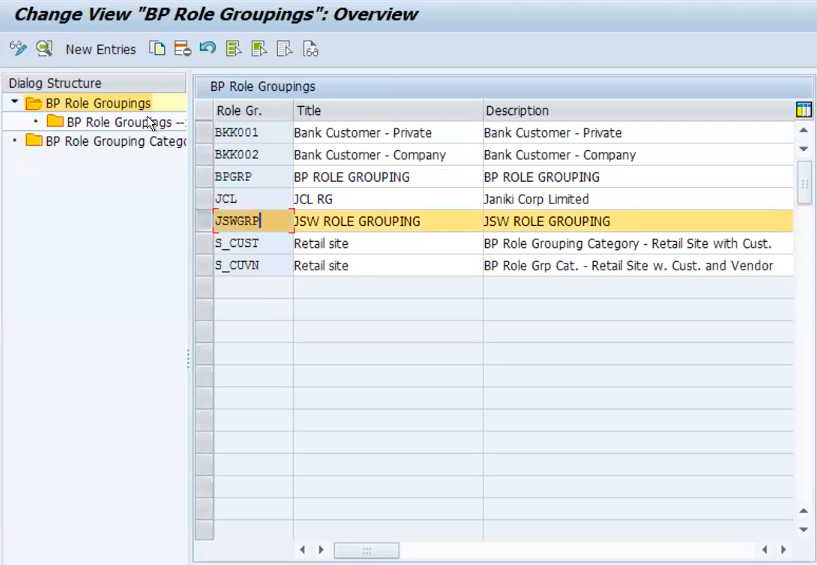
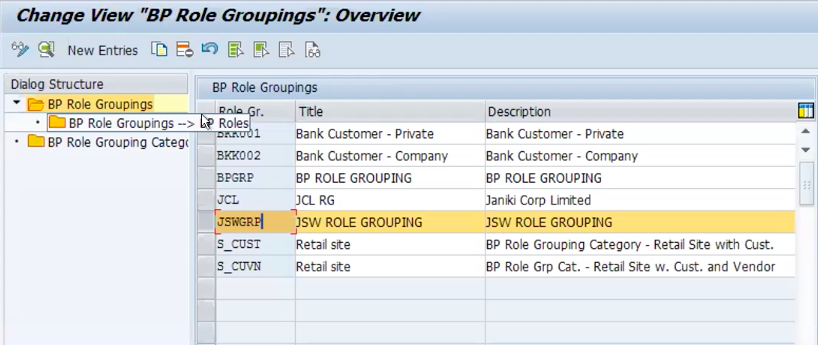
Click on the left side of the screen on the option – BP Role grouping —> Bp Roles.
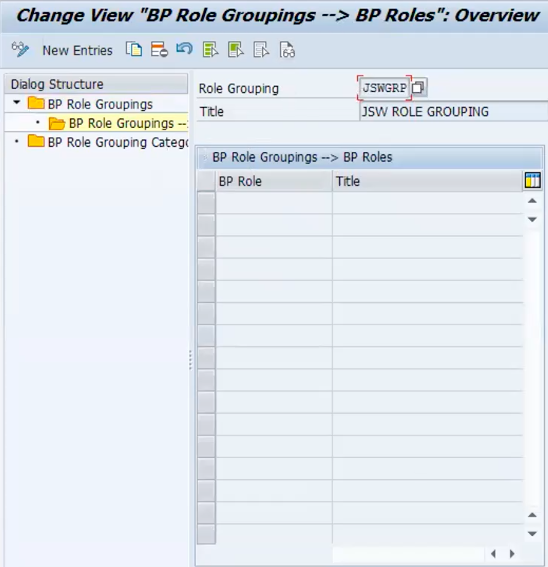
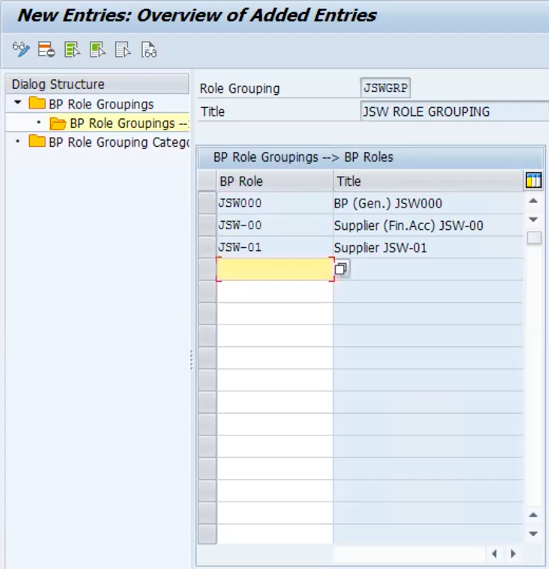
New entries and add the BP Roles you created above in step 1, step 2 and step 3.
Enter and then save the data.
DEFINE BP ROLE GROUPING CATEGORIES
Step 1: Define BP Role Grouping Category
Path -> SPRO -> IMG -> Cross-Application Components -> SAP Business Partner -> Business Partner -> Basic Settings -> Business Partner Roles -> Define BP Role Grouping Categories.
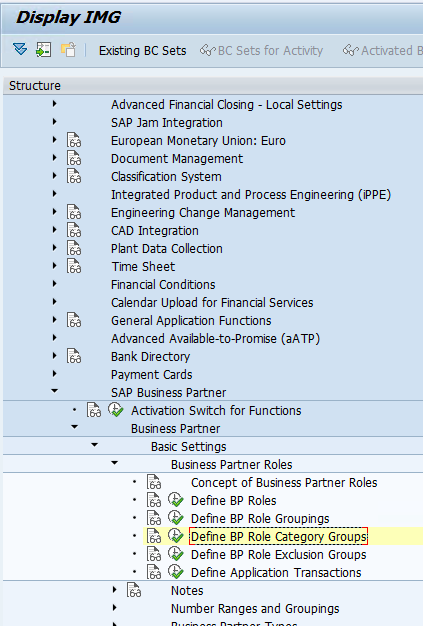
New entries.
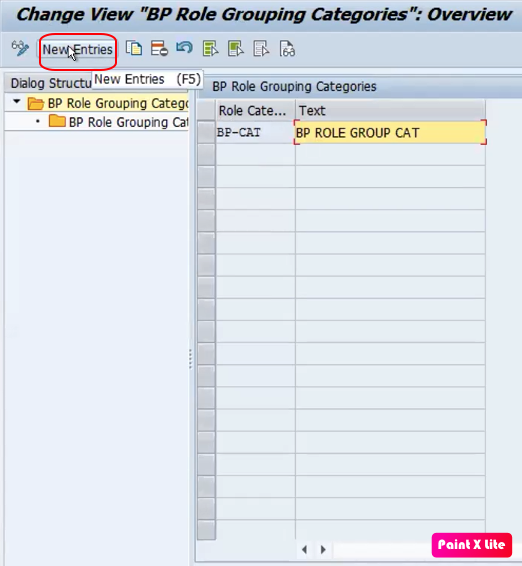
Add an entry and save the data.
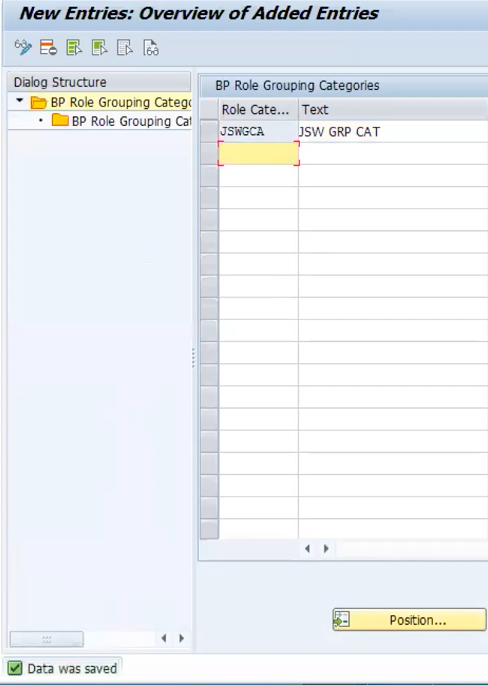
Step 2: Assign BP Role Grouping Category to BP Roles.
Go back and select your Grouping category. Click on BP Role Grouping Category —> BP Roles Category.
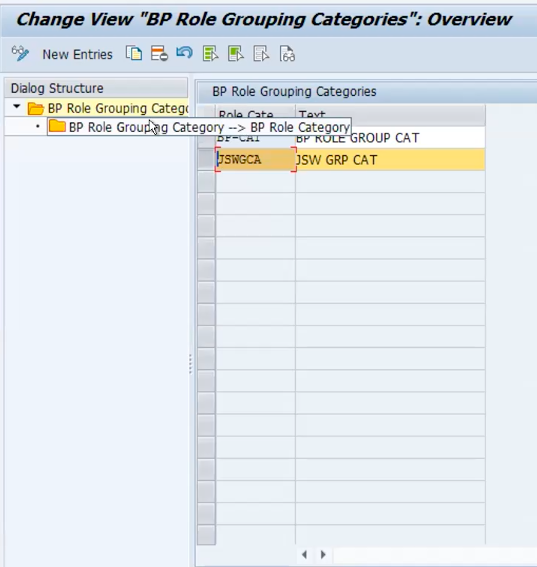
Click on new entry.
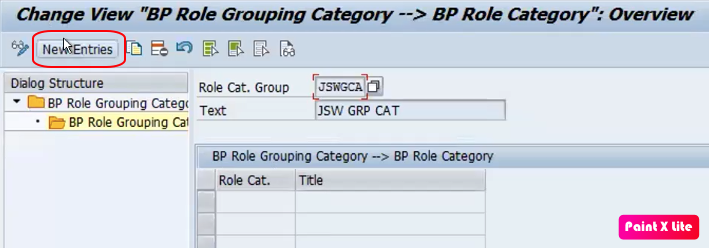
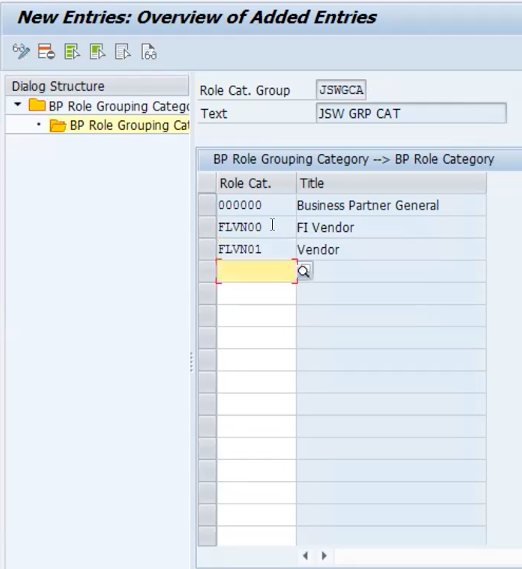
Add your Standard BP Roles in the table, press enter and save the data. This means you have assigned you BP Role Grouping Categories to your standard BP Roles.
NUMBER RANGE FOR BUSINESS PARTNER
Step 1: Define number ranges for BP
Path -> SPRO -> IMG -> Cross-Application Components -> SAP Business Partner -> Business Partner -> Basic Settings -> Number Ranges and Groupings -> Define Number Ranges
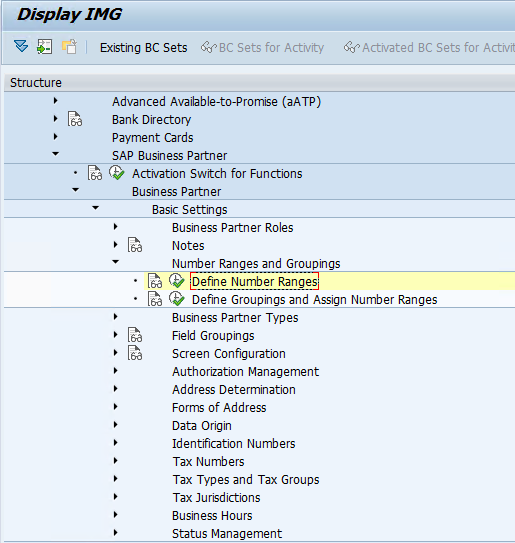
Here number range follows same method as we did in material creation, internal number range is automatically inputted and external number range is manually updated.
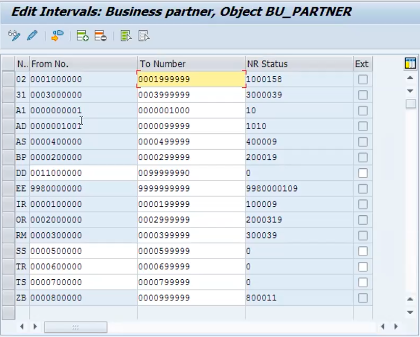
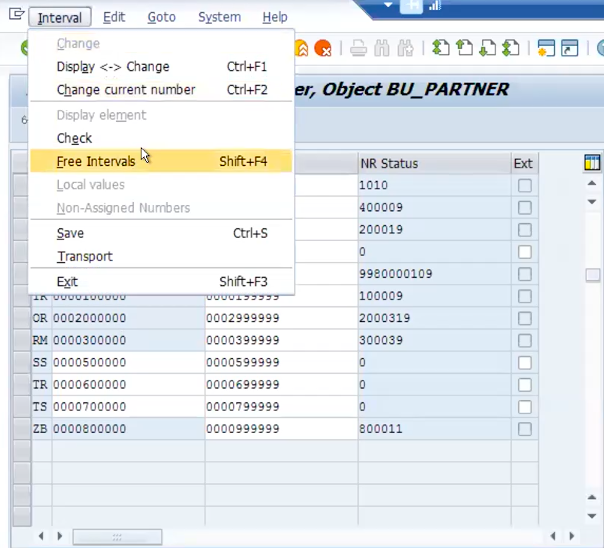
Go to interval and Select – Free Intervals
You will get a display box displaying all the available free number ranges among which you can select one.
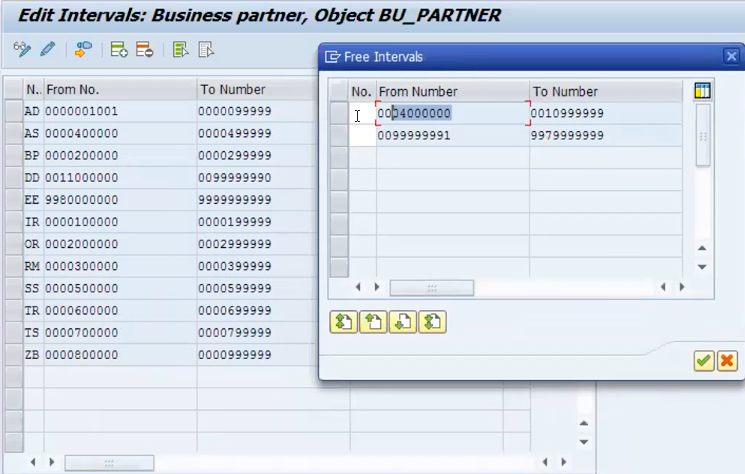
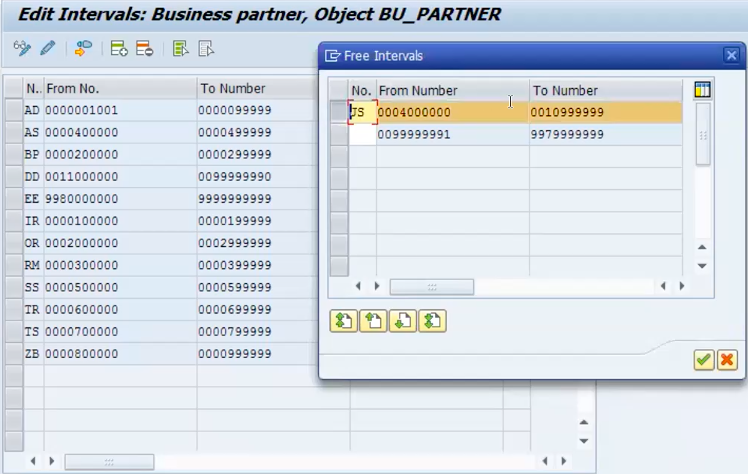
Give the no. to the selected number range, select the row and click on green check.
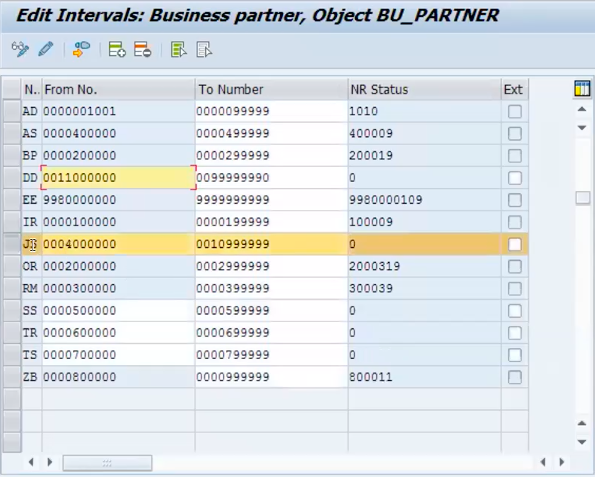
The created number range will appear in the number range interval table.
Step 2: Define Groupings and Assign Number Ranges
Path -> SPRO -> IMG -> Cross-Application Components -> SAP Business Partner -> Business Partner -> Basic Settings -> Number Ranges and Groupings -> Define Groupings and Assign Number Ranges.
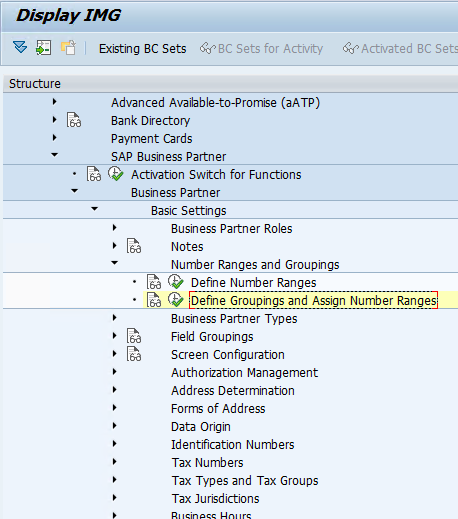
New entries and enter your grouping which you want to create for you BP.
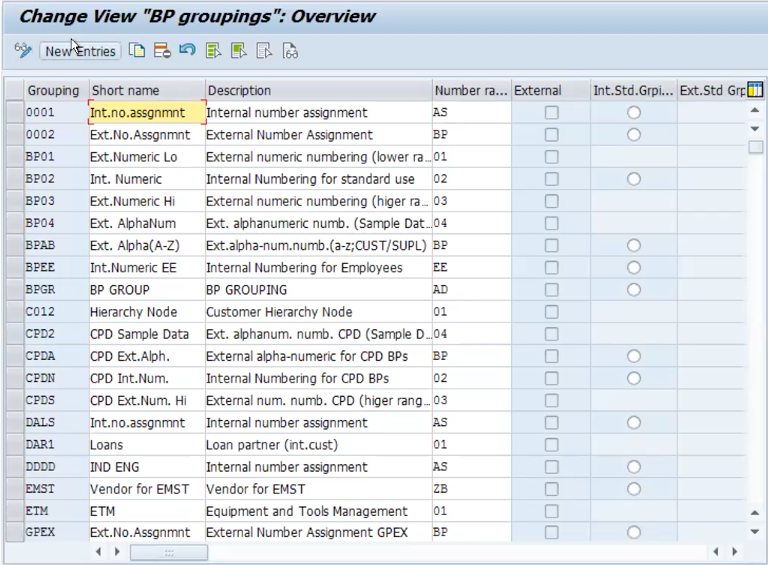
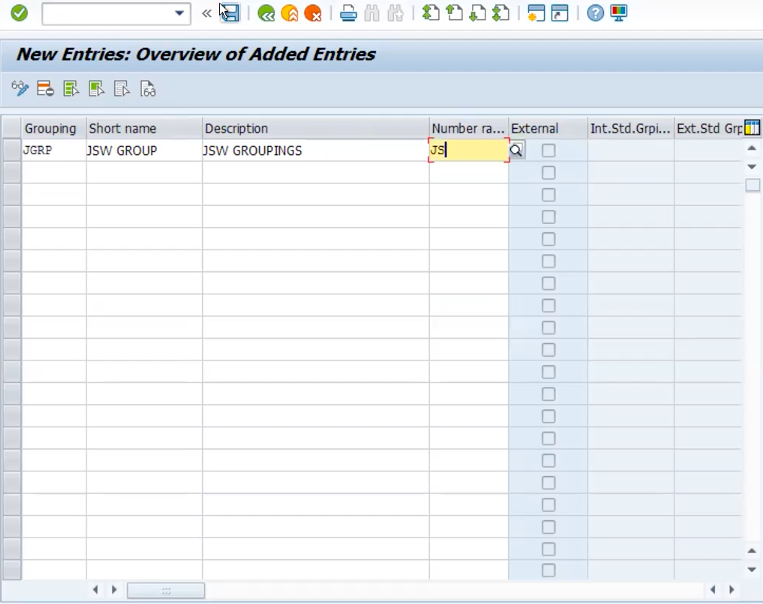
Enter all the fields as shown below in the figure. Add number range you just created above. Save the data.
(Note: The grouping should be 4 digit code)
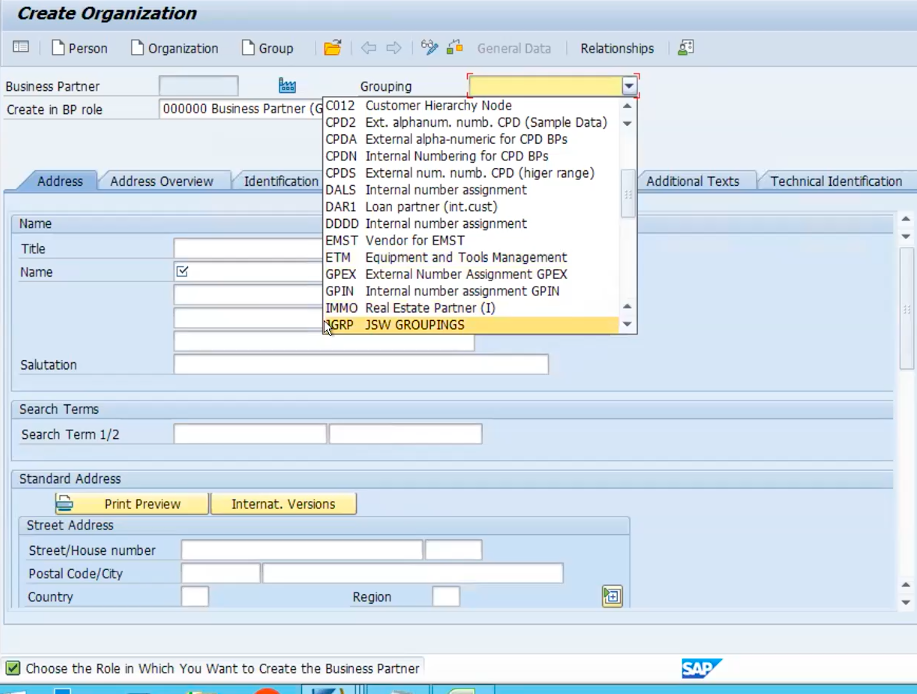
Go to BP transaction code and under grouping, you can find your newly created grouping JGRP.
DEFINE VENDOR FOR BP
Step 1: Define Vendor Groups
Path -> SPRO – IMG -> Financial accounting -> Accounts Receivable and Accounts Payable -> Vendor Accounts -> Master Data -> Preparations for Creating Vendor Master Data -> Define Account Groups with Screen Layout (Vendors)
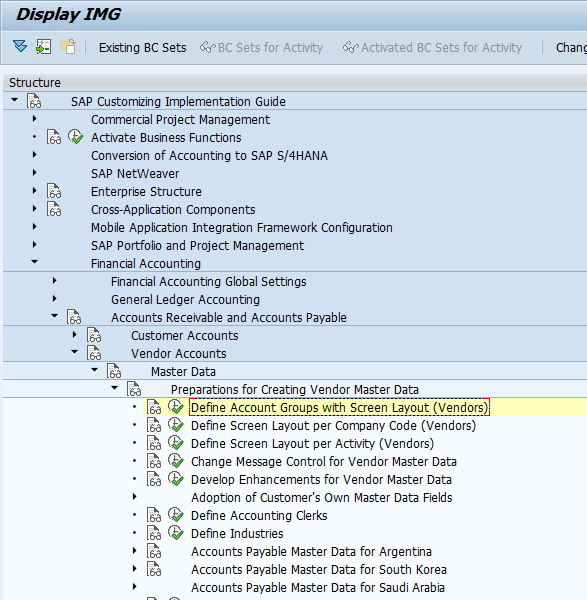
Select and go to new entry.
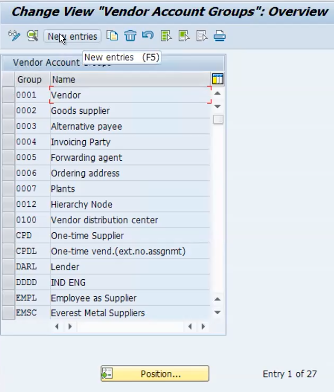
Add detials.
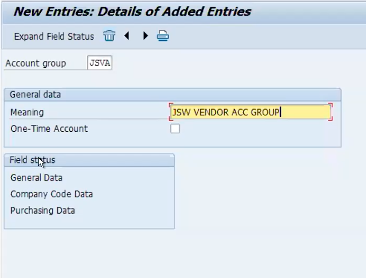
Click on general data under field status.
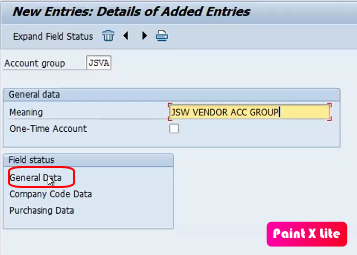
You can see various general data categories which you can set to optional, required, suppress and display inputs.
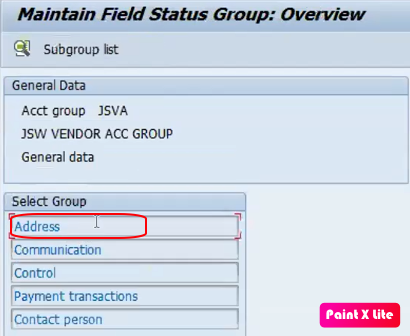
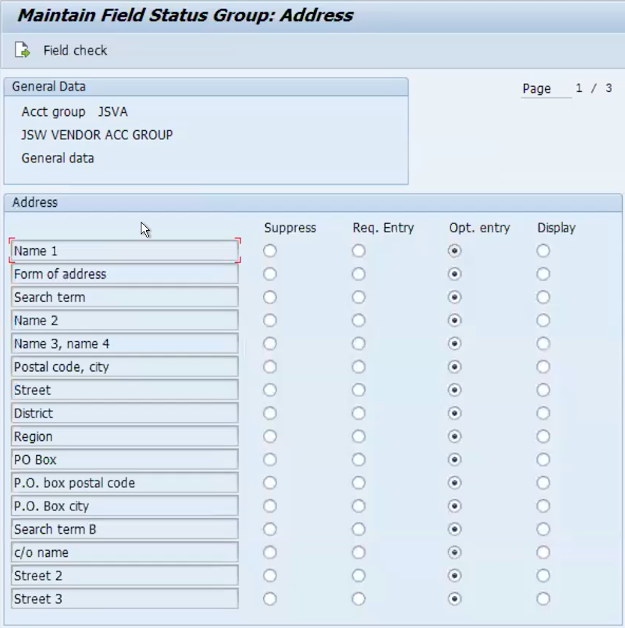
For example, we can select Postal Code city and region as required entry and set other as optional entry. You can set any of these entries according to your business needs. Save the data after any modifications.
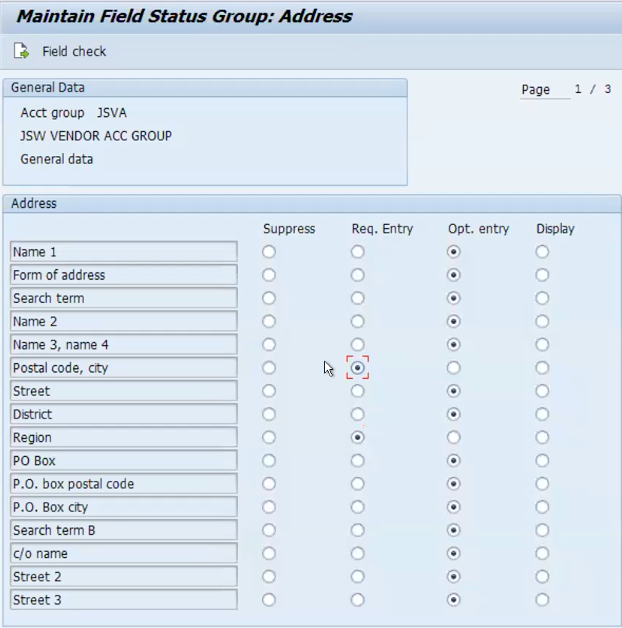
As we did for General data, similarly, we can do for Company code data and Purchasing data.
Step 2: Create Number Ranges for Vendor Accounts
Path -> SPRO – IMG -> Financial accounting -> Accounts Receivable and Accounts Payable -> Vendor Accounts -> Master Data -> Preparations for Creating Vendor Master Data -> Create Number Ranges for Vendor Accounts
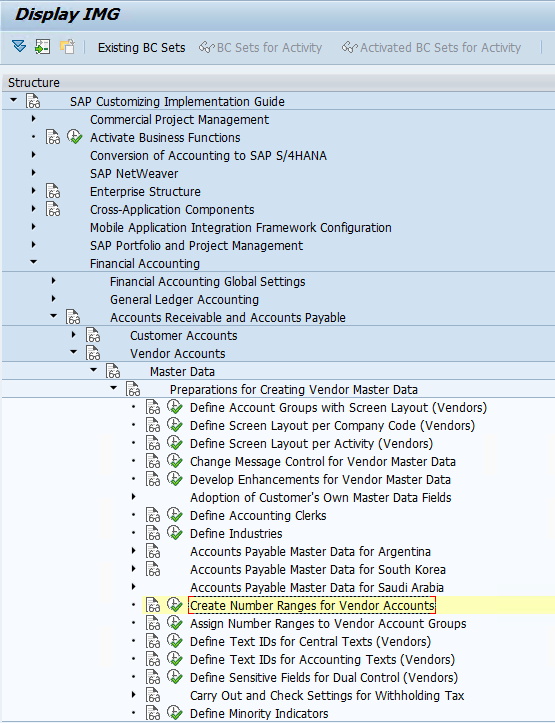
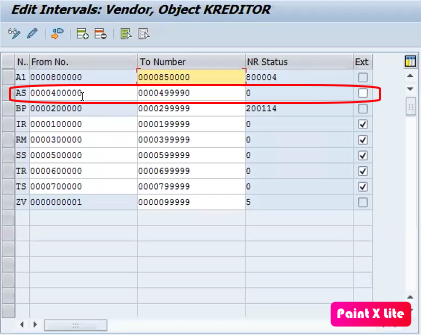
You have two options here, you can use the same number range as you used for orals can use different number range also. Here we will be using different just as an example.
I will be using the AS number range which was already available in the interval table. Check that the External column is not tick.
Step 3: Assign Number Range to Vendor Account Groups.
Path -> SPRO – IMG -> Financial accounting -> Accounts Receivable and Accounts Payable -> Vendor Accounts -> Master Data -> Preparations for Creating Vendor Master Data -> Assign Number Range to Vendor Account Groups.
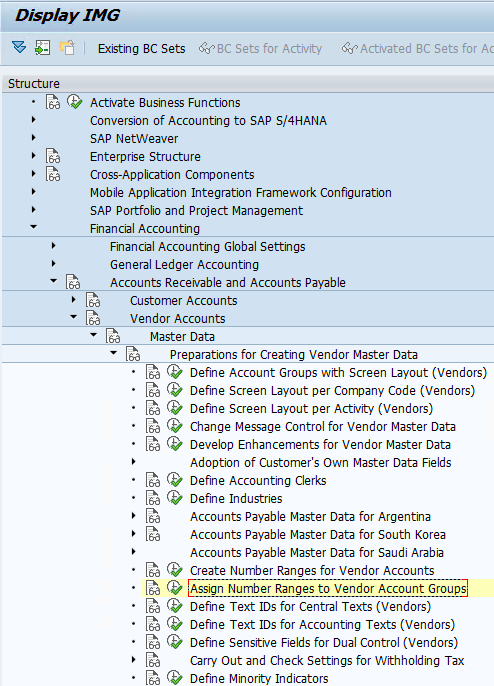
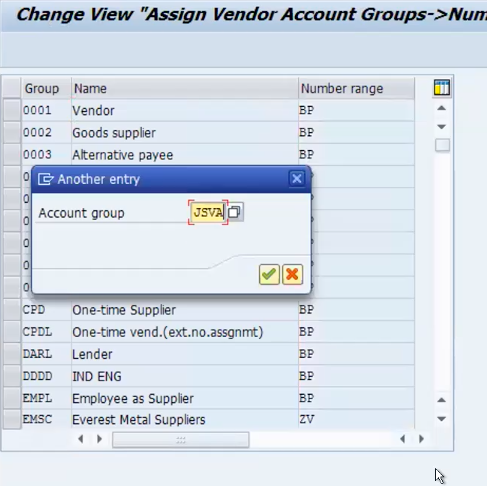
Select Assign Number Range to Vendor Account Groups and click on position and enter your Account Group
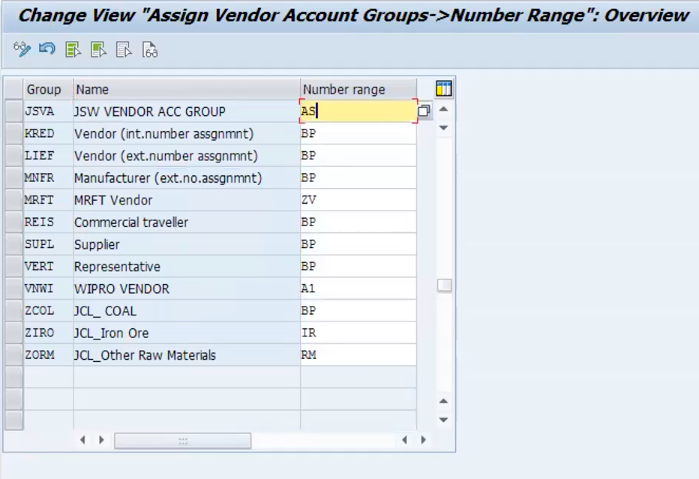
Assign the number range selected. Save the data.
ASSIGN BUSINESS PARTNER AND VENDOR ACCOUNT GROUPING
Step 1: Set BP Role Category for Direction BP to Vendor
Path -> SPRO -> Cross-Application Components -> Master Data Synchronisation -> Customer/ Vendor Integration -> Business Partner Settings -> Settings for Vendor Integration -> Set BP Role Category for Direction BP to Vendor
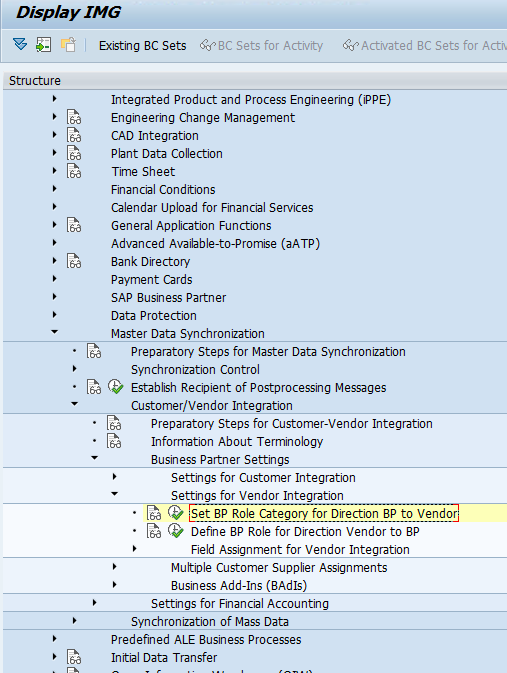
Check whether all your standards are mentioned there or not.
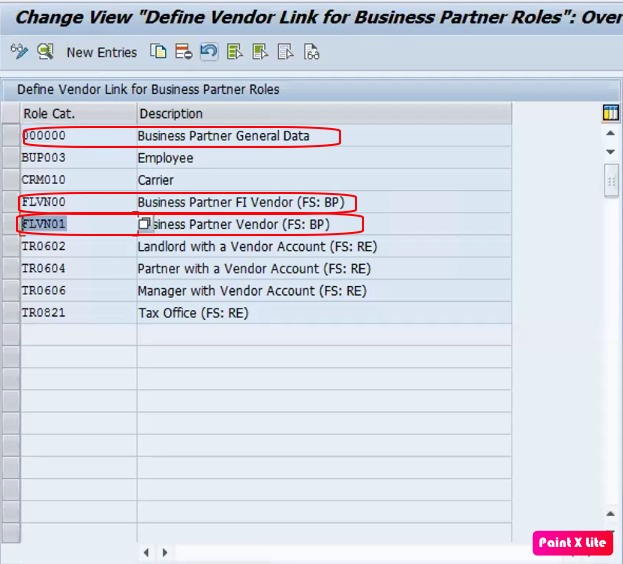
Save data and go back to the IMG screen.
Step 2: Define BP role to Direction Vendor for BP
Path -> SPRO -> Cross-Application Components -> Master Data Synchronisation -> Customer/ Vendor Integration -> Business Partner Settings -> Settings for Vendor Integration -> Define BP role to Direction Vendor for BP
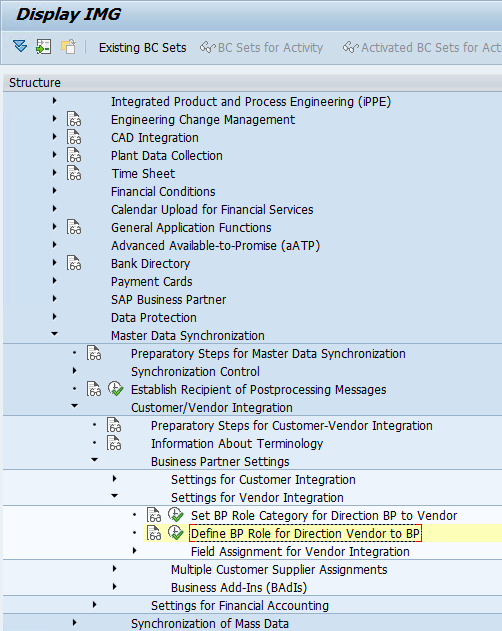
Click on that and new entries and add the BP Roles you created. Save the data.
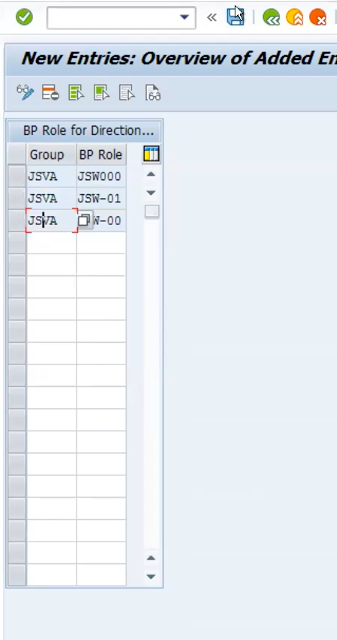
Step 3: Define number Assignment for Direction BP to Vendor
Path -> SPRO -> Cross-Application Components -> Master Data Synchronisation -> Customer/ Vendor Integration -> Business Partner Settings -> Settings for Vendor Integration -> Field Assignment for Vendor Integration -> Define number Assignment for Direction BP to Vendor
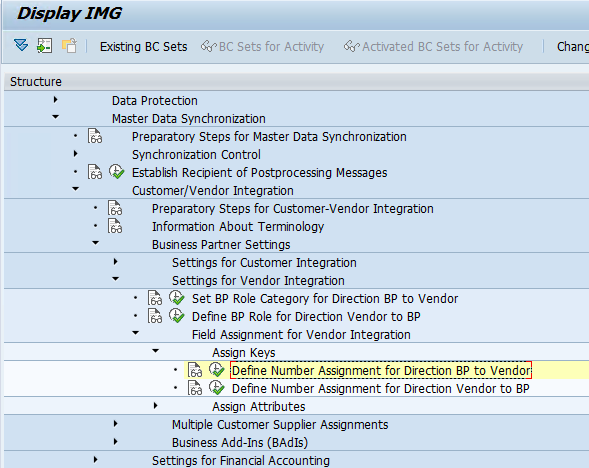
Here we have to assign – JGRP and JSVA which we have created above.
Click on Define number Assignment for Direction BP to Vendor and go to New entries. Add GRP and Group and click enter.
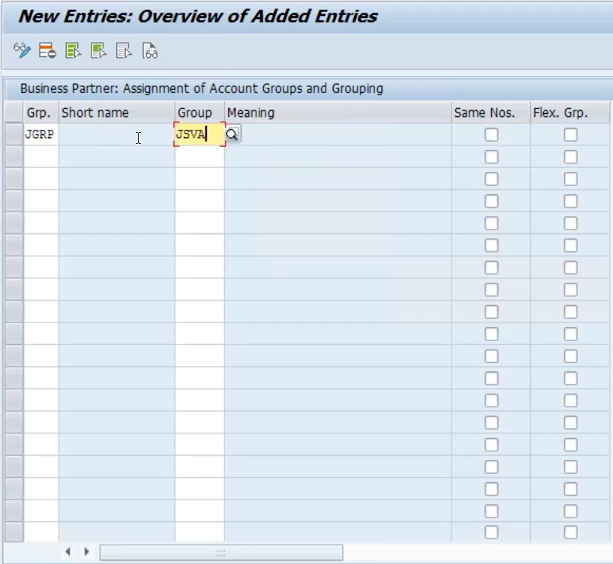
Click on Same Nos. Column if you have assigned same number ranges to both. If you have assigned different, as we have taken above, then don’t click in the column. Save the data.
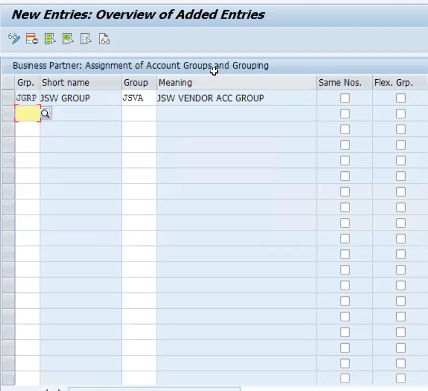
Step 4: Define number Assignment for Direction Vendor to BP
Path -> SPRO -> Cross-Application Components -> Master Data Synchronisation -> Customer/ Vendor Integration -> Business Partner Settings -> Settings for Vendor Integration -> Field Assignment for Vendor Integration -> Define number Assignment for Direction Vendor to BP
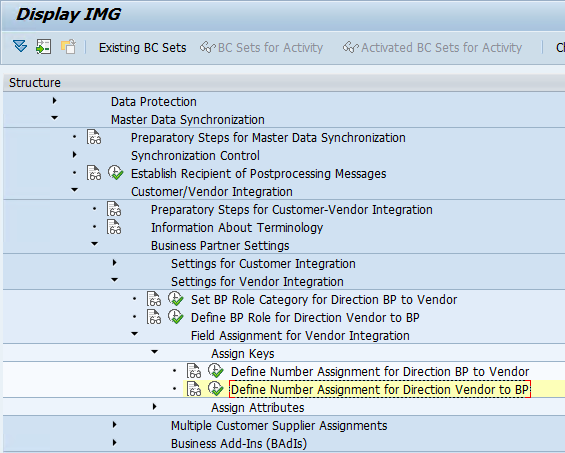
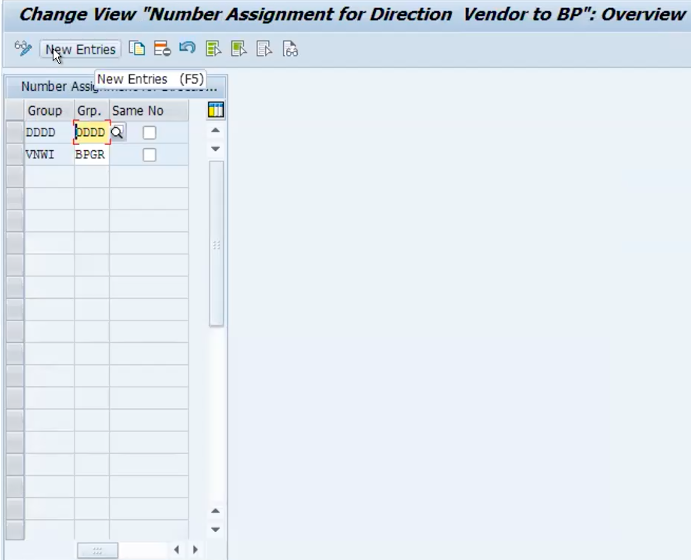
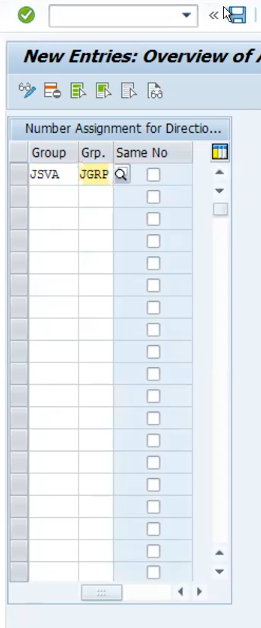
Click on Define number Assignment for Direction Vendor to BP and new entries. Fill the data and save it.
BP configuration is completed. Next article we will create BP.
